
Ever felt the allure of a flickering candle’s flame and wanted to make your own from scratch? Venturing into the craft of homemade candles offers a serene escape from the digital world. Crafting candles at home is both an art and a science, blending colors, scents, and waxes to create the perfect ambiance. With the right guidance, anyone can create beautiful, customized candles to adorn their living spaces or gift to loved ones.
In this guide, we’ll walk you through the basics of making your own homemade candles. We’ll cover everything from choosing wax and wicks to crafting unique scents. We’ve got tips, tricks, and safety advice to help you get started. So let’s dive in, and before you know it, you’ll be creating your own cozy ambiance with homemade candles!
Candle Making Instructions: Key Takeaways
- The type of wax chosen for candle making (such as paraffin, soy, or beeswax) will affect factors such as burn time, fragrance throw, and overall quality of the candle.
- Selecting the right wick size is crucial for a clean and even burn, and different types of wicks (such as cotton, zinc, or wooden) are recommended for different types of wax.
- Candle coloring can be achieved using liquid dyes, powder dyes, or dye chips, and scents can be added using essential oils or fragrance oils for a variety of aromas.
- There are various candle making techniques to explore, including molded candles, freeform candles, container candles, dipped candles, and candle carving, each offering unique possibilities for shapes and designs.
What Candle Making Supplies Do You Need?
Candle making is a captivating craft that allows creators to design personalized sources of warmth and ambiance for their spaces. Whether you’re a beginner looking to explore this hobby or an enthusiast aiming to refine your skills, having the right supplies is paramount. A well-equipped workspace not only ensures a smoother crafting process but also yields higher-quality results. Here’s a comprehensive breakdown of the essential tools and materials you’ll need to make your own candles:
Basic Candle Making Supplies
- Wax: There are various types of wax available, including paraffin, soy, beeswax, and palm wax. Your choice of wax will depend on your preference and the kind of candle you wish to make.
- Wicks: Ensure you have the correct length and thickness for your chosen candle size. There are different types of wicks like cotton, wood, and braided, each with its burning characteristics.
- Molds or Containers: Depending on whether you’re making pillar candles, container candles, or votives, you’ll need suitable molds or containers. Silicone and metal molds are popular choices.
- Melting Pot: A double boiler or a microwave-safe container is essential for melting and pouring the wax.
- Thermometer: To monitor the wax’s temperature, ensuring it’s melted to the right consistency.
Optional but Helpful Supplies
- Dyes or Pigments: If you want to add color to your candles.
- Fragrance Oils or Essential Oils: For scented candles. Make sure they’re specifically designed for candles to ensure proper scent throw and safe burning.
- Stirring Stick or Spoon: Useful for mixing in dyes and fragrances evenly.
- Wick Holders or Chopsticks: These help in keeping the wick centered while the wax cools.
- Wick Trimmer: For trimming the wick to the ideal length once the candle has set.
- Safety Equipment: Such as heat-resistant gloves and safety goggles, especially if you’re dealing with large amounts of hot wax.
- Labels and Packaging: Particularly important if you plan to sell or gift your candles.
Advanced Supplies (For those looking to experiment further)
- Mold Release Spray: Helps in easily removing the candle from the mold.
- Decorative Additives: Such as dried flowers, glitter, or embeds for added aesthetics.
- Wick Tabs: Useful if you’re making tealight candles or need to secure shorter wicks at the base.
By ensuring you have the right supplies at hand, you’ll be well-equipped to start your candle-making journey. Whether you’re making candles for personal use or considering it as a business venture, having quality supplies is crucial to producing beautiful and safe candles.
Understanding the Basics of Making Your Own Candles
We’ll start with the three basic components of candle making: wax, wick, and container.
Wax is the foundation of your candle. It’s what gives it shape and size, and it even influences how long your candle will burn. There are several different types of wax available, the most popular being paraffin, soy, and beeswax. Each has its own unique properties and benefits.
The wick is the heart of the candle. It’s what keeps the flame alive and burning. The right wick size is essential for a clean, even burn.
Finally, the container. It’s not just about aesthetics, but safety too. A good container should be heat resistant and large enough to hold the melted wax.
How to Choose the Best Type of Wax
Navigating the world of candle-making can be a delightful yet intricate endeavor. One of the foundational choices every candle-maker must grapple with is selecting the ideal wax. The type of wax chosen can significantly impact various aspects of the candle, from its burn time to its scent throw and the quality of its finish.
Burn Time: Quality and Duration
When it comes to the longevity of a candle, burn time serves as a crucial indicator. The longer a candle burns, the more value and enjoyment you derive from it. Beeswax stands out in this category. With its innate honey fragrance, beeswax candles not only offer an aromatic experience but also burn more slowly than many other waxes, ensuring a prolonged lifespan for your candle.
Scent Throw: Fragrance Intensity and Distribution
For those who prioritize a strong and far-reaching aroma, the scent throw of the wax is paramount. Soy wax has garnered popularity for its exceptional ability to carry and release fragrance. When infused with essential oils or fragrance oils, soy wax candles can fill a room with a captivating aroma, making them a favorite choice for many.
Finish and Versatility: Appearance and Use
The aesthetic appeal of a candle is often determined by the finish of the wax. Paraffin wax, while less natural compared to its counterparts, is renowned for its glossy, high-quality finish. Its versatility also means it can be used in various candle forms, from pillars to votives.
In conclusion, each type of candle wax comes with its unique set of advantages. Whether you prioritize natural ingredients, a strong scent throw, or a glossy finish, understanding the properties of each wax type will empower you to make an informed decision in your candle-making journey.
Comparison of Different Types of Wax for Candle Making
| Property | Paraffin Wax | Beeswax | Soy Wax |
|---|---|---|---|
| Origin | Petroleum-based | Produced by bees | Derived from soybean oil |
| Burn Time | Moderate | Longest (slow burning) | Longer than paraffin but shorter than beeswax |
| Scent Throw | Good | Natural honey scent (mild scent throw) | Excellent (best for fragrance) |
| Finish | Glossy | Matte to slightly glossy | Matte |
| Eco-friendliness | Less eco-friendly (byproduct of petroleum) | Highly eco-friendly (natural & biodegradable) | Eco-friendly (biodegradable) |
| Price | Generally cheaper | Premium (can be expensive) | Mid-range |
| Melting Point | Varies (generally higher than soy) | High (around 145°F or 62°C) | Lower (around 120°F to 180°F or 49°C to 82°C) |
| Versatility | Very versatile (used in many candle types) | Limited (harder to mix with colors & fragrances) | Versatile but best for container candles |
Selecting the Right Wick
After picking the perfect wax, we’ve got to focus on selecting the right wick, for it plays a crucial role in how our homemade candles will burn. Different wicks create different burn rates, so understanding the options is essential.
Cotton wicks are a great choice for soy or beeswax candles, as they burn cleanly and evenly. For paraffin wax, consider zinc or wooden wicks, they’re known for their steady burn and delightful crackling sound. The choice of wick can influence not just the burn time but also the intensity of the flame and the dispersal of fragrance. To make an informed decision in your candle-making endeavors, here’s a breakdown of the different types of wicks:
- Flat Wicks:
- Designed with a braided pattern and are flat in appearance.
- Characteristically burn with a curl, aiding in reducing carbon buildup.
- Typically found in taper and pillar candles.
- Square Wicks:
- Braided like flat wicks but boast a more substantial structure.
- Especially effective for harder-to-burn waxes like beeswax.
- Known for a cleaner burn with minimal soot.
- Cored Wicks:
- Constructed with a central core, often made of cotton, zinc, or paper.
- The core provides the wick with added stability.
- Ideal for larger candles, as they produce a larger flame.
- However, some types, especially those with zinc cores, can produce more soot.
- Wooden Wicks:
- Crafted from natural wood or a blend of wood and cotton.
- Emanate a comforting crackling sound, similar to a wood-burning fireplace.
- Frequently chosen for high-end or artisanal candles for their ambiance-enhancing properties.
The wick is, without a doubt, a cornerstone in candle making. Factors such as the candle’s diameter, wax type, and the desired ambiance all come into play when wicking your candle. As always, trial and testing hold the key to achieving a harmonious balance in candle crafting.
In our candle making journey, choosing the right wick is as important as choosing the right wax.
Coloring Your Homemade Candles
Now, let’s move on to an exciting aspect of candle making – coloring your candles.
Understanding the different types of candle dyes and how to measure them can make all the difference in achieving the perfect hue. We’re here to guide you through this process, ensuring your homemade candles are as vibrant and beautiful as any store-bought variety.
Types of Candle Dyes
We’re moving on to explore the vibrant world of candle dyes, which will truly bring our homemade candles to life. Candle dyes come in three primary types: liquid, powder, and dye chips. Each offers a unique advantage and can result in varying color intensity and hue.
- Liquid Dyes: These are highly concentrated and offer bold, rich colors. A few drops can dramatically transform your wax.
- Powder Dyes: These offer subtle control over the color’s intensity. Just a pinch can create a pastel shade, while more can create a deeper tone.
- Dye Chips: These are easy-to-use, pre-measured blocks of color. They’re great for beginners and assure a consistent color batch after batch.
Selecting the right dye type can enhance your candle-making experience and make your candles truly unique.
How to Measure Candle Dyes
Before we dive into the specifics of measuring, it’s crucial to understand that the amount of dye we use can significantly influence the final color of our candles. Too much can create a dark shade without clearly defined colors, while too little can result in a washed-out tone.
Using a scale allows for measurement by weight, ensuring precision down to the gram. For a medium shade, about 0.05% dye is typically required, which translates to around 7 or 8 drops of liquid dye for every pound of wax. To put this into perspective, each drop is roughly 0.03 grams.
In the world of candle-making, whether your aim is a deep burgundy or a delicate peach, the mastery of dye measurement ensures your candles glow in the exact hue you’ve envisioned.
Crafting Unique Scents

As we venture into the art of crafting unique scents for our homemade candles, we’ll first differentiate between essential oils and fragrance oils. We’ll then guide you on how to combine scents to create your own signature aroma and discuss important safety considerations to keep in mind.
Lastly, we’ll learn how to accurately measure fragrances in candles and explore the concept of fragrance load.
Essential Oils vs. Fragrance Oils
In this section, we’ll look at the various differences between essential oils and fragrance oils, so you can choose the best scenting oil for your candles.
Essential oils, derived directly from plants, imbue our candles with natural, therapeutic aromas. They’re perfect for an intimate setting, offering not only a delightful scent but also potential health benefits.
On the other hand, fragrance oils are synthetically produced, providing a broader range of scents. They’re fantastic for crafting candles with unique, complex aromas that last longer. They’re also known to be more reliable, but candle users who care about the health benefits of candles may prefer essential oils.
How to Combine Scents to Craft Signature Aromas
The trick to creating custom candle scents is to pair complementary notes for a harmonious blend. Start by choosing a base note, the scent that lingers longest and acts as the foundation.
Next, add a middle note, often a more mellow scent to balance the base.
Finally, top it off with a top note, a scent that hits the nose first, usually sharp and bright.
Don’t be afraid to experiment. Mix and match oils until you find the blend that speaks to you. Remember, it’s all about creating a scent that’s uniquely yours. Create, enjoy, repeat! In time, you’ll develop a number of scent profiles that are uniquely yours.
What is Fragrance Load?
Before we move on to the next step in the process, it’s important for us to understand what fragrance load means and how it impacts the overall quality of our homemade candles.
Fragrance load refers to the maximum amount of scent that can be added to a candle without it seeping out of the wax. It’s the key to crafting our unique, aromatic blends.
Increasing the fragrance load enhances the scent throw, making our candles more fragrant. However, we must be careful. Too high a fragrance load and the candle may not burn properly, or the scent may be overpowering. It’s a delicate balance, one that we’ll master with practice.
Finding the perfect fragrance load, we’ll craft candles that provide a warm, inviting atmosphere.
How to Measure Fragrances in Candles
After taking the necessary safety precautions, let’s now delve into how to measure fragrances for our homemade candles in order to craft unique and captivating scents. It’s essential to get the right balance; too little fragrance and the scent will be lost, too much and it can overwhelm.
The art of crafting the perfect candle involves many nuances, and determining the precise fragrance volume is a pivotal step in this process. The foundation of this calculation is a percentage, known as the fragrance load, which represents the amount of fragrance that can be safely incorporated into the wax without affecting the burn quality or scent throw. The fragrance load is largely dependent on the type of wax used, with a general guideline being between 5% to 6% if no specific information is available. However, certain waxes, like the paraffin wax IGI 4627, can accommodate as high as a 12% fragrance load, which is notably high.
To begin the calculation, one must first measure the amount of wax needed for the batch of candles in either ounces or grams. It’s crucial to note that this measurement should be by weight and not by volume. Once the weight of the wax (W) is known, the desired fragrance load (f) must be decided upon. While waxes can sometimes hold high amounts of fragrance, it’s essential to strike a balance. Overloading can lead the candle to emit an undesirable fuel-like odor rather than the intended fragrance.
With the wax weight and desired fragrance load in hand, the weight of the fragrance oil (F) can be determined using the formula below:
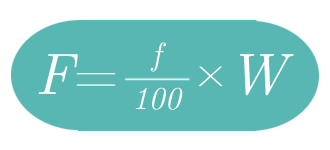 By converting the fragrance load into a decimal and multiplying it by the wax weight, the required amount of fragrance oil can be calculated. For instance, if one were working with 16.5 ounces of wax and a fragrance load of 8%, the resulting fragrance oil weight would be 1.32 ounces, bringing the total blend weight to 17.82 ounces. This mathematical approach ensures that the final candle product has the optimal scent intensity and quality.
Types of Candles You Can Make
Now, let’s discuss the different styles of candles you can handcraft at home.
From molded and freeform candles to container and dipped candles, there’s a variety to suit every preference and skill level. Each type offers a unique aesthetic and crafting experience, all ready to light up your DIY journey.
Molded Candles
Let’s dive into the fascinating world of molded candles, a type we can create with a variety of shapes and sizes. The beauty of these candles comes from the molds we use, which can range from simple geometric shapes to intricate designs. It’s a delightful process that offers a high degree of customization, allowing us to express our creativity.
| Type | Mold Material | Complexity |
|---|---|---|
| Pillar Candles | Silicone or metal | Low-Moderate |
| Figurine Candles | Silicone | High |
| Votive Candles | Silicone or metal | Low |
Whether you use metal, polycarbonate, or silicone candle molds, there are a wide array of molds and material options to work with. Each offers different benefits for different situations—for example, metal candle molds are easy to clean and durable, lasting forever. Silicone molds wear out eventually but can capture greater detail, and their flexibility lets you create more intricate designs. You can also make your own silicone candle molds at home, giving you more power to make custom candle designs. Polycarbonate doesn’t last as long as metal either, but you can clearly see the details of your candle on the inside while it hardens, which is great for decorated candles.
Each type presents a unique set of challenges and rewards. Pillar candles are great for beginners, while figurine candles require a bit more skill due to the nooks and crevices innate to the more complex shape. Votive candles are perfect for those seeking simplicity. So, let’s get crafting and create some beautiful molded candles!
Freeform Candles
We’re stepping into the imaginative realm of freeform candles, another type of homemade candle we can craft with endless possibilities for shapes and designs.
Freeform candles let us express our creativity, as we’re not confined to a particular mold. We can play with wax, bending and shaping it as the medium cools. It’s a delicate process, but we’re here to guide you through it.
First, we’ll prepare our wax, melting it until it’s liquid but not too hot. Then, we’ll pour it onto a flat surface. As it starts to solidify, we can begin manipulating it into our desired shape. Owning pottery tools can make freeform candle crafting more enjoyable as you sculpt your candles into your ideal shape.
Container Candles
Diving into the world of container candles, we’ll find they’re not only easy to make but also incredibly versatile. These candles are perfect for beginners, and they allow for a great deal of creativity. You can use virtually any non-flammable and heat-treated container, from mason jars to teacups.
Each type lends a unique character to the setting. The best part? The process is pretty straightforward! We just add a wick, pour heated wax directly into the containers, and let it cool.
Dipped Candles
Shifting our focus now, we’ll explore dipped candles and their timeless appeal. First, let’s understand what they are.
Dipped candles, or taper candles, are the oldest type of candles and are made by repeatedly dipping a wick into hot wax. What’s fascinating about this candle making process is that it’s simple, yet requires patience and precision. The thickness of the candle depends on the number of times you dip the wick. You can even add color and scent to the mix, giving your candles a personal touch.
We’d recommend using beeswax for your first dipped candles as it burns slowly and has a delightful, natural aroma.
How to Pour Container Candles
Pouring candles is both an art and a science, a process that transforms simple wax into a beautiful source of light and ambiance. As we embark on this journey, it’s essential to grasp the nuances of the pouring process to achieve the best results. Here’s how to ensure our candles set perfectly:
- Preparation: Before we begin, ensure that the wicks are anchored firmly in the center of our chosen molds. This will prevent them from moving when we pour the hot wax, ensuring they remain straight as the wax sets.
- Pouring: With our wicks in place, it’s time to introduce the wax. Gently pour the hot wax into the molds, making sure to leave a slight space at the top. This gives us room to add more wax later if necessary. Pouring slowly is vital; it minimizes the risk of air bubbles, which can mar the candle’s appearance and affect its burn.
- Cooling: Once the wax is poured, the waiting game begins. As tempting as it may be to expedite the process, allowing the wax to cool naturally ensures a smooth finish. It’s common for the wax to sink slightly in the middle as it solidifies. This is a natural part of the cooling process and is easily rectified by topping off with a little more melted wax.
- Finishing Touches: After the wax has completely set, all that remains is to trim the wick to the desired length. This not only gives our candle a neat appearance but also ensures it burns evenly.
Congratulations! We’ve now crafted a candle that’s not only functional but also a testament to our dedication and skill. Light it up, and bask in its warm, inviting glow.
Setting Your Wick
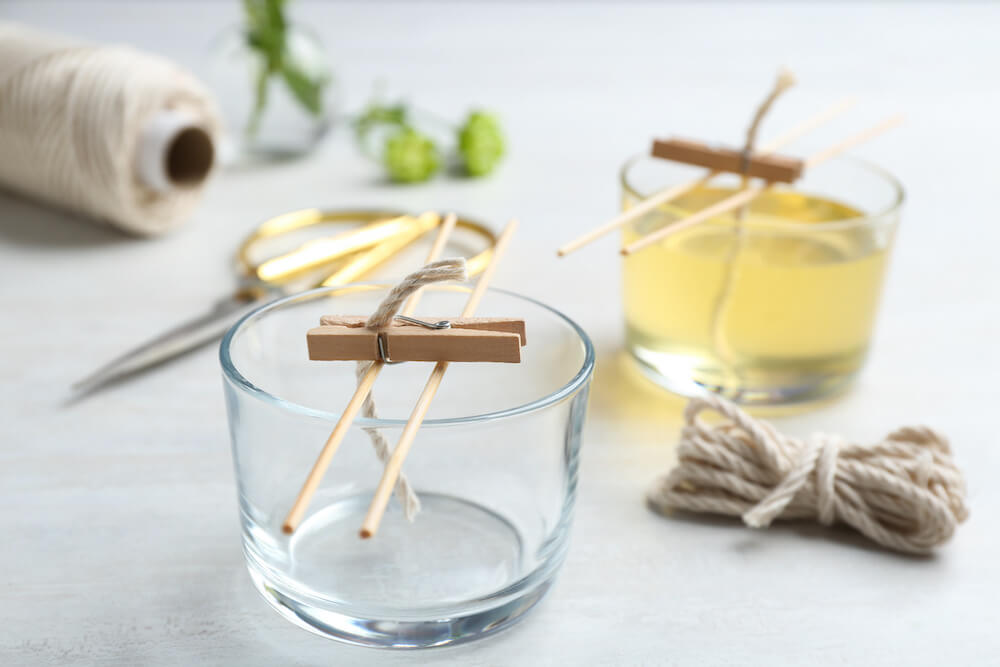
The first step to making container candles is to set your wick, a vital part of candle making that involves positioning and securing it in the center of the container. We must ensure it’s straight because the way our candle burns is heavily dependent on the wick placement.
We’ll take a wick and secure one end to the bottom of our container using a bit of melted wax. We’ll let it dry for a moment. After that, we’ll gently pull the wick taut and secure the other end to a pencil or skewer resting across the top of the container. This will keep the wick centered while we pour in the wax.
Remember, patience is key here. Let’s take our time to get it just right.
Now, we’re ready to pour our wax.
Heating Your Candle Wax
Before getting started on our next step, we’ll need to heat up the candle wax to the right temperature. It’s crucial to remember that overheating can lead to discoloration, cracking, poor fragrance throw, poor glass adhesion, and frosting.
We recommend using a double boiler or a specialized candle wax melter. Here’s how: Fill a large pot with water and place a smaller pot inside, ensuring it doesn’t touch the bottom. Add your wax into this smaller pot. The water in the larger pot will heat the smaller pot gently and evenly.
Monitor the temperature with a thermometer, aiming for about 185°F (85°C). Once we’ve achieved this, we’ll remove the wax from heat immediately.
We’re well on our way to making our own beautiful, fragrant candles.
Pouring Your Candle Wax
Pouring candle wax is a critical step in the candle-making process that requires accuracy and a methodical approach. To achieve a smooth and consistent candle, begin by ensuring the wax is melted to the recommended temperature, typically between 170°F to 185°F. Once the wax is ready, pour steadily into your mold or container, maintaining a consistent flow to prevent air bubbles. It’s essential to leave a small space at the top of the mold, allowing room for any necessary adjustments later. After pouring, let the wax cool and solidify before making any further modifications. Proper pouring technique ensures a well-formed candle that burns evenly.
Candle Decorating Ideas
Now that we’ve mastered the basics of candle making, let’s turn our attention to the art of decorating our creations.
We can enhance the visual appeal of our candles by adding inclusions, layering colors, or even carving intricate designs. These techniques won’t only personalize our candles, but they’ll also make each one a unique work of art.
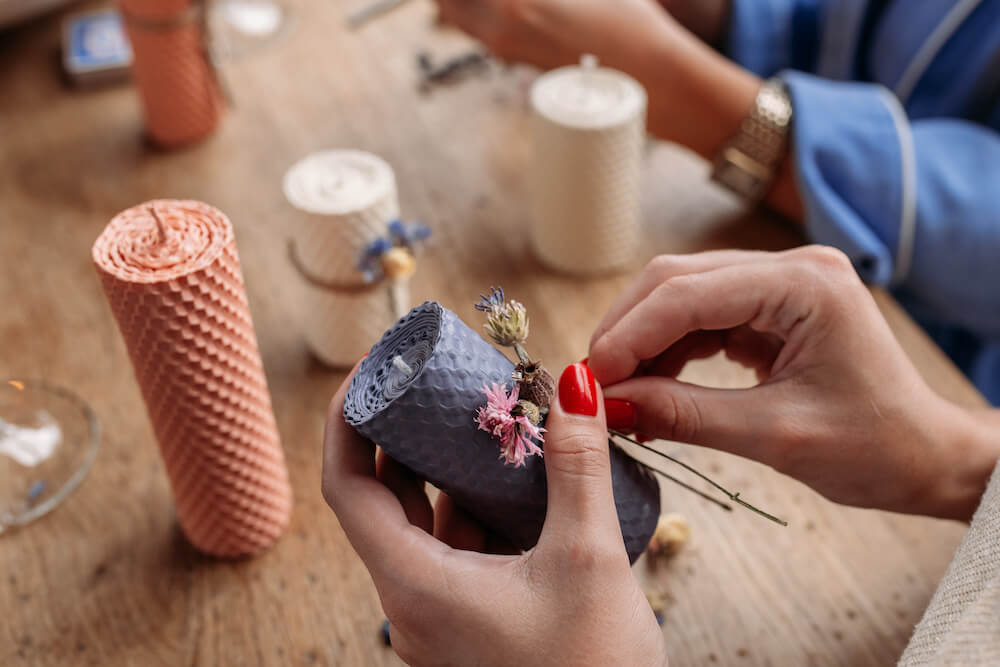
Adding Inclusions
In this section, we’ll dive into the creative process of adding inclusions for a unique touch on your homemade candles.
Inclusions are small items we embed into the wax before it sets. They’re a beautiful way to personalize your candles and add a dash of intrigue. We can use an array of materials such as dried flowers, glitter, or small trinkets.
It’s essential, though, to ensure these items are non-flammable or encapsulated in the wax well away from the wick to prevent any fire risks. Always remember, safety first when it comes to candle making.
Once you’ve chosen your inclusions and securely placed them, you can pour our wax. Then, you patiently wait for your masterpieces to set.
Layering Colors
Experimenting with color layering can elevate your candle designs and is an exciting part of the candle making process.
We start by selecting two or more colors that complement or contrast each other. We then melt our wax, dividing it equally into separate containers for each color. After adding our preferred dye to each batch of wax, we let it cool slightly.
Now comes the fun part – layering. We pour our first color into the mold, allowing it to set before adding the next layer. We repeat this process until we’ve used all our colors. It’s important we’re patient between layers to avoid mixing colors.
Carving Your Candles
After we’ve crafted our homemade candles, it’s time to delve into the world of candle carving, where our creativity can truly shine through, and we can make our candles truly one-of-a-kind.
Start with a fully cooled, firm candle. You’ll need a candle carving knife or small paring knife and a bit of patience. You can then carve your design – whether it’s a simple monogram, a floral pattern, or a more intricate scene – slowly and carefully, always carving away from yourself.
Remember, it’s not about perfection, but about personalization. Once your design is carved, you can highlight it with a contrasting colored wax, or leave it as is for a subtle, sophisticated look. It’s truly up to you.
Now, let’s get carving!
Candle Packaging Ideas
You’ve made your beautiful candles, now turn your attention to some creative candle packaging ideas.
How about eco-friendly boxes? They’re attractive, sustainable, and spotlight your environmental commitment. Hand-stamped tissue paper gives a personal touch and can be paired with a charming ribbon or string. If you’re feeling more adventurous, explore the world of custom printed boxes, allowing you to incorporate your brand’s logo or unique designs.
Safety Considerations For DIY Candle Making
Before we dive further into this hobby, it’s imperative that we discuss safety procedures and best practices in candle making, because they’re as important as the creative process itself.
Safety While Handling Hot Wax
Remember, we’re dealing with heat and potentially flammable materials. Always work in a well-ventilated area, away from anything that could easily catch fire. Make sure you’re using safe, heat-resistant containers for your candles. Don’t leave your melting wax unattended, and keep a fire extinguisher nearby just in case.
Always be cautious when handling hot wax; it’s better to use a double boiler to gently heat it. Lastly, let’s not forget about safe wick practices. Trim your wick to 1/4 inch before lighting, and never burn a candle unattended.
Safety While Handling Fragrances
It’s also important to practice safety when blending scents, to protect from far more insidious health concerns.
Essential oils are commonly used for scenting candles, but they’re heavily concentrated and can cause irritation or pain if mishandled. Always wear gloves when handling essential oils and never allow them to come into contact with your eyes or skin. If you do spill essential oils on your skin, immediately rinse the area with soap and water, and consider diluting the oil with a simpler and less concentrated type of oil that won’t damage your skin further.
We must also ensure to use the correct amount of scent; too much can cause a candle to smoke excessively or burn too quickly, which can be hazardous.
It’s also important to wear VOC-filtering respirators while making candles, as prolonged exposure to high volumes of candle scents can damage your lungs. Work in a well-ventilated space as much as possible, and make sure you air out your workspace regularly so candle scents don’t linger.
Candle Burn Tests: What They Are and How to Conduct Them

Now that we’ve covered safety, let’s delve into the realm of candle burn tests, a crucial aspect of candle making that ensures quality and longevity, and we’ll also guide you on how to carry them out effectively.
Essentially, a burn test judges how your candle performs when lit. Here’s a simple way to conduct one:
- First, light your candle.
- Let it burn for at least an hour (or until the wax melts across the entire top).
- Watch closely for how evenly the wax pool forms.
- Also, check for soot on the jar’s sides.
- If the flame flickers excessively, it’s too big; if it’s too small, it’ll drown in the wax.
- Make notes about how your candle performed so you can adjust your candle making process next time.
Troubleshooting Common Candle Issues
Even with the best techniques, we might encounter a few bumps on the road to perfect candle making.
Let’s address common candle making problems, such as cracks and fissures, tunneling, mushrooming, drowning wicks, and crackling & popping. With our expertise, we can guide you through these challenges and help you turn them into opportunities for honing your craft.
Cracks and Fissures
We’re moving on to tackling problems you might encounter during candle making, starting with cracks and fissures. These pesky issues often occur when candles cool too quickly or inconsistently. We’ve got a few handy tips to help you out.
First, try slowing down the cooling process. You can achieve this by covering your candles with a box or turning off any fans in the room.
Secondly, ensure your candles are cooling evenly. Rotate them occasionally and avoid placing them near windows or other sources of drafts or heat.
Lastly, if you’re still having trouble, consider using a different type of wax. Some waxes are simply more prone to cracking.
Don’t let these obstacles discourage you; with practice comes perfection.
Candle Tunneling
The candle maker’s journey isn’t without challenges, and tunneling is another common issue that we’ll discuss next. Candle tunneling is when your candle burns down the middle, leaving a thick ring of unused wax around the sides. It’s frustrating, we know, but we’re here to help you solve this problem.
First, to avoid tunneling, ensure you’re burning your candle long enough during its initial burn. We recommend allowing the wax to melt across the entire diameter of the candle. This might take a few hours, but it’s crucial to set the stage for future burns.
If your candle’s already tunneling, fear not. You can fix a tunneling candle by wrapping in aluminum foil, leaving a small hole at the top, and lighting it. This method helps melt the excess wax.
Candle Mushrooming
After dealing with tunneling, let’s move on to another common problem in candle making, known as ‘mushrooming’, and don’t worry, we’ve got you covered with solutions for this one too.
Candle wick mushrooming happens when excess carbon builds up on your wick, creating a ‘mushroom’ shape that can cause soot and uneven burning. To prevent this, always trim your wick to a quarter inch before lighting and try to avoid burning your candle for more than four hours at a time.
If you notice mushrooming while your candle is burning, extinguish it, let it cool, trim the wick, and relight.
Drowning Wicks
Now, we’re tackling the issue of ‘drowning wicks’, and it’s quite a common hiccup in the candle making process. If your wick is drowning, it’s likely because the wax pool is too deep. This can happen if the candle is left burning for too long, or the wick is too small for the candle diameter.
Crackling & Popping
We’ve mastered the mystery of the drowning wick, and we’re ready to tackle another common candle issue: the crackling and popping sounds you might hear as your candle burns.
Now, don’t be alarmed, these sounds can be quite normal. Candle wax isn’t always a homogeneous substance: it can contain tiny air pockets. As the wax melts, these air pockets can cause a crackling sound.
However, if it’s a constant issue, it might be the wick that’s to blame. You see, a wick that’s too large for the candle’s diameter can cause excessive crackling. We recommend using a smaller wick or a different wick material.
And remember, always trim your wick to about 1/4 inch before each burn to prevent popping and excess soot production.
Taking Your Creative Candle Making Hobby to the Next Level
Once you’ve mastered the basics of candle making, it’s time to take your hobby to the next level.
One way to do this is by joining candle communities. These groups can provide us with tips, advice, and inspiration to further enhance our candle making skills. If you’re interested in starting your own candle making business, this is a great first step to familiarize yourself with the competition.
Joining Candle Communities
Let’s take a look at the exciting step of joining a candle community to take our candle making hobby to the next level. These communities can be a fantastic source of inspiration, knowledge, and camaraderie. They’re often filled with people just like us who have a passion for candle making and want to share their experiences, tips, and techniques.
To find a community, we can start by searching online. Many social media platforms have groups dedicated to candle making. Joining is usually as simple as clicking a button and introducing ourselves. We can also look for local candle making clubs in our area.
Let’s remember, everyone started somewhere, so don’t be shy! Take that step, and let’s enrich our candle making journey together.
Turning Your Candle-Making Hobby Into a Business

After honing your skills and gathering inspiration from various candle communities, you might be considering turning your passion into profit. Venturing into the candle-making business can be both rewarding and challenging. To get started, it’s essential to conduct market research to understand the current demand and identify your target audience.
Craft a unique selling proposition that sets your candles apart from the competition. This could be based on scent, design, packaging, or an eco-friendly approach. Setting up an online store and leveraging social media for marketing can significantly boost your reach. Additionally, attending local craft fairs or collaborating with local businesses can provide avenues for showcasing your products.
Remember, consistency in quality, understanding customer preferences, and adapting to market trends will be key. With dedication and a strategic approach, you can successfully transition from a hobbyist to a thriving business owner in the candle industry.
Candle Making For Beginners: Frequently Asked Questions (FAQ)
How Much Time Does It Typically Take to Make a Homemade Candle From Start to Finish?
We’ve found that it typically takes around 2-4 hours to make a homemade candle from start to finish. This includes preparing, melting, and setting the wax, but timing can vary based on your method and materials. Making candles in batches is often more efficient than just making one at a time.
Can Candle Making Be a Profitable Business and What Are the Initial Investment Costs?
Yes, we can definitely turn candle making into a profitable business. Initial investment costs depend on the scale, but we’re usually talking about anywhere from a few hundred dollars for supplies and marketing to several thousand for a full business-scale production.
Are There Any Online Communities or Resources for Beginner Candlemakers to Connect With Others and Learn More?
Sure, there’s a plethora of platforms providing perfect places for beginner candle crafters. We’d recommend Reddit’s r/candlemaking community and Facebook groups. They’re teeming with tips, tutorials, and fellow enthusiasts eager to engage and enlighten.
Start Your Adventure Making Candles at Home!
We’ve journeyed together through the art of candle making, and we know some may think it’s tricky. But remember, every master was once a beginner.
The joy of crafting your own unique scents, colors, and even candle designs far outweighs any initial challenges. It’s not just about the candles you create, it’s about the warmth, the aroma, and the cozy ambiance they bring into your life.
So why wait? Let’s light up our world with homemade candles!